CM-FX6: WEC7: Getting Started
Contents
Connecting the module
The following picture shows the recommended evaluation kit setup for the SB-FX6.
- -
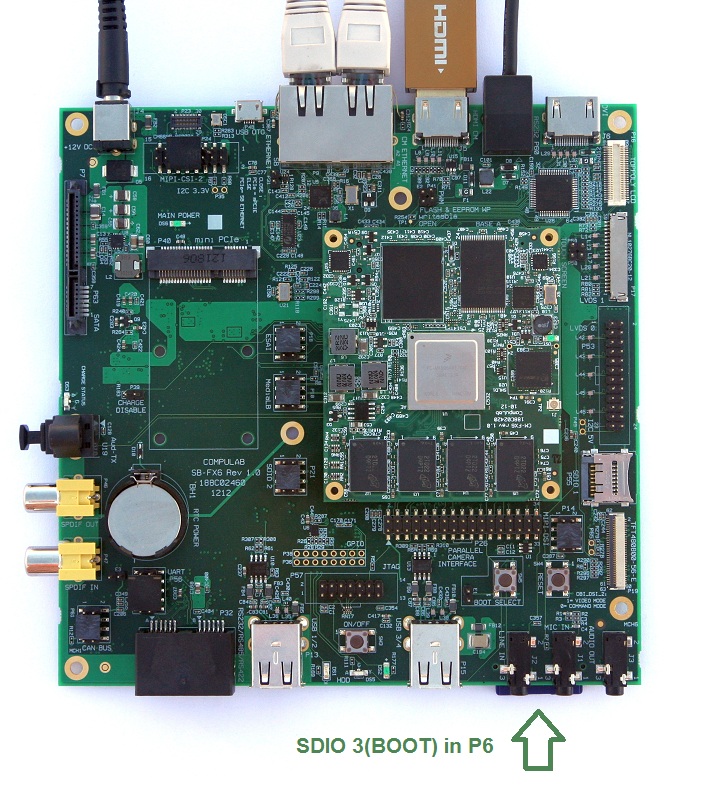

| In the SB-FX6 the SD card is installed on the base's SDIO 3 slot (P6) |
Setting Up a Console
- Obtain a PC workstation with a serial communication port. If your desktop does not have a serial port, it is possible to use a standard USB to serial adapter.
- Connect the CM-FX6 to your desktop serial port with the cable supplied in the evaluation kit.
- Any terminal emulation application can be used to display messages sent from the serial port of the target.
- Configure the terminal application with the following communications parameters:
- Baud rate: 115200
- Parity: None
- Data bits: 8
- Stop bits: 1
- Flow control: None
Creating a bootable SD card
- Download the latest WEC 7.0 runtime image for CM-FX6 and unzip the package to a directory on the host PC.
- Use cfimager.exe to create a disk with a partition table geometry which is compatible with the FX6 boot ROM.
- Follow the following steps:
- Insert the SD card into an SD-Reader attached to the desktop computer (an SD-card is supplied with the CM-FX6 evaluation kit).
- Launch Windows standard Command Prompt utility - cmd.exe (located in the Start->Accessories->CommandPromt).
- Navigate to the LiveDisk folder that can be found inside the unziped package.
- Use the following commands to flash the bootloader and the run-time image:
- - cfimager -f eboot.nb0 -d <sd card reader drive letter without colon> -imx53 -a
- - cfimager -f nk.nb0 -d <sd card reader drive letter without colon> -imx53
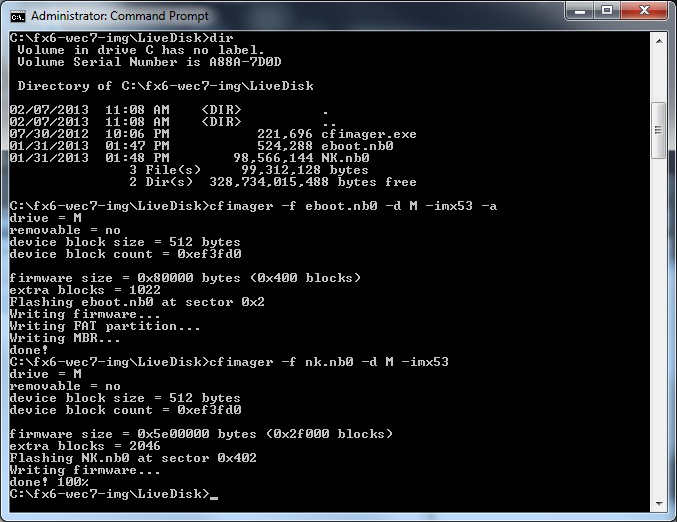
- Your SD card is now ready to boot the CM-FX6.

| The cfimager.exe is a standard utility that is implemented and maintained by Freescale Semiconductor. |
Booting the system
- Install the bootable SD card on the SB-FX6 SDIO 3 slot (P6).
- Power on the device.
- Type run run_eboot in U-Boot. For further details about startup boot sequence configuration, please refer to U-Boot Programming.
- The CompuLab WinCE demo image is loaded from the SD card.
- A Windows Embedded Compact 7 desktop will appear on the display connected to the HDMI port within a few seconds.