Difference between revisions of "CM-FX6: Android: Getting started"
(→Normal operation) |
(→Advanced installation options) |
||
| (3 intermediate revisions by the same user not shown) | |||
| Line 1: | Line 1: | ||
| − | == | + | == Overview == |
| − | + | The following outlines the procedure necessary to install Android on the CompuLab CM-FX6 System-on-Module / Computer-on-Module. | |
| − | |||
| − | |||
| − | == | + | == Installation target media == |
| − | * Download | + | CM-FX6 may use either SD card (P6) or SATA SSD as root file system. |
| − | + | ||
| + | == Installation onto SD card == | ||
| + | === Preconditions === | ||
| + | * [[Media:CM-FX6_Properly_Connected2.jpg|Properly connected]] CM-FX6 evaluation kit with valid U-Boot. | ||
| + | * SD-Card with minimal capacity of 2GB, which will serve as boot medium and root file system. | ||
| + | * PC workstation for creating bootable SD-Card. | ||
| + | |||
| + | === Prepare bootable SD-Card === | ||
| + | * Download prebuilt [http://compulab.co.il/products/computer-on-modules/cm-fx6/#devres Android image]. | ||
* Unzip the file in order to get ''dd'' image.<br/> | * Unzip the file in order to get ''dd'' image.<br/> | ||
| − | * | + | * Flash the bootable image to the SD-Card following the [https://help.ubuntu.com/community/Installation/FromImgFiles directions]. |
| − | : On Linux, the instructions below | + | : On Linux, the instructions below may be used instead: |
<pre> | <pre> | ||
| − | # dd if=cmfx6-android.img of=/dev/sdc | + | # dd if=cmfx6-android.img of=/dev/sdc bs=4M |
</pre> | </pre> | ||
| − | == Boot == | + | === Boot === |
| − | * Insert | + | * Insert bootable SD-Card into SD-Card slot (P6). |
* Power on. | * Power on. | ||
* Within 3 seconds the device should start booting into Android. | * Within 3 seconds the device should start booting into Android. | ||
: Within 60 seconds the HDMI display should start showing ''signs of life''. | : Within 60 seconds the HDMI display should start showing ''signs of life''. | ||
| − | === | + | == Installation onto SSD == |
| − | + | === Preconditions === | |
| − | + | * [[Media:CM-FX6_Properly_Connected2.jpg|Properly connected]] CM-FX6 evaluation kit with valid U-Boot. | |
| − | * | + | * SD-Card with minimal capacity of 2GB, which will serve as installer file system. |
| − | + | * PC workstation for creating bootable SD-Card. | |
| + | |||
| + | === Prepare installer SD card === | ||
| + | * Download prebuilt [http://compulab.co.il/products/computer-on-modules/cm-fx6/#devres installer image]. | ||
| + | * Uncompress the file in order to get ''dd'' image. | ||
| + | * Flash the bootable image to the SD-Card following the [https://help.ubuntu.com/community/Installation/FromImgFiles directions]. | ||
| + | : On Linux, the instructions below may be used instead: | ||
<pre> | <pre> | ||
| − | + | # dd if=cm-fx6_android-ssd-installer.img of=/dev/sdc bs=4M | |
| − | |||
| − | |||
</pre> | </pre> | ||
| − | |||
| − | == | + | === Launch installer === |
| − | * | + | * Insert the bootable SD card into the CM-FX6 SD socket (P6) and turn the device on. |
| − | + | * CM-FX6 will automatically boot into the installer LXDE desktop. | |
| − | : | + | * Double click on the CM-FX6 Image Installer icon to begin installation and follow the installation wizard directions. |
| − | : | + | |
| − | * | + | === Boot === |
| − | : | + | * After the installation is complete, shut down CM-FX6 and remove the installation SD card. |
| − | : | + | * Restart CM-FX6. |
| + | {{Note | If the installation SD card is not removed, CM-FX6 will boot into the installer once again.}} | ||
| + | * Within 3 seconds the device should start booting into Android. | ||
| + | : Within 60 seconds the HDMI display should start showing ''signs of life''. | ||
| + | |||
| + | === Advanced installation options === | ||
| + | As CM-FX6 is developer-oriented device, the installation process and installer script itself can be customized, in order to fit customer's specific requirements.<br/> | ||
| + | The following section provides an insight into interactive installation process and installer implementation. | ||
| + | |||
| + | ==== Installation wizard GUI ==== | ||
| + | In the process of installation, the user is presented with a few dialogue windows.<br/> | ||
| + | In the top part of each window a brief description is provided.<br/> | ||
| + | The main stations in the installation process are: | ||
| + | * Target device selection - currently, only SATA SSD may be presented. | ||
| + | * Default partition size overriding - resizing the Android file system partitions, keep in mind: | ||
| + | ** ''userdata'' - is where user applications are installed, and where user content (such as downloaded files, recorded video or audio, etc.) is stored | ||
| + | ** resizing additional partitions can hardly be benefited | ||
| + | * Default video mode setting - select LCD, HDMI or DVI video output and its resolution. It is possible to override this setting later, following the ''display configuration'' [[CM-FX6: Android: Operating instructions#Display configuration | directions]]. | ||
| + | |||
| + | ==== Installer script structure ==== | ||
| + | Below provided particular details about installer script structure: | ||
| + | * The installer is located within installer file system, under<br/> | ||
| + | :<code>/var/opt/utilite-installer/Android/cm-fx6-<release ID></code> | ||
| + | * The interactive installer consists of 2 phases: | ||
| + | ** '''fs-inflate-gui:''' interactive GUI, that overrides default values in a configuration file | ||
| + | ** '''fs-inflate:''' non-interactive installer script, that follows the configuration file, partitions the destination medium, formats it and copies the OS files | ||
| + | * For additional details on the Android installation process on CM-FX6, it is recommended to refer either to the installer script source code, or to the [[CM-FX6: Android: Building from source code | Building from source code]] page. | ||
== See Also == | == See Also == | ||
| − | |||
* [[CM-FX6: Android: Serial console connection]] | * [[CM-FX6: Android: Serial console connection]] | ||
| + | * [[Android: ADB setup]] | ||
* [https://help.ubuntu.com/community/Installation/FromImgFiles Installing SD Card image] | * [https://help.ubuntu.com/community/Installation/FromImgFiles Installing SD Card image] | ||
[[Category:Android]] | [[Category:Android]] | ||
[[Category:CM-FX6]] | [[Category:CM-FX6]] | ||
Latest revision as of 09:18, 17 December 2014
Contents
Overview
The following outlines the procedure necessary to install Android on the CompuLab CM-FX6 System-on-Module / Computer-on-Module.
Installation target media
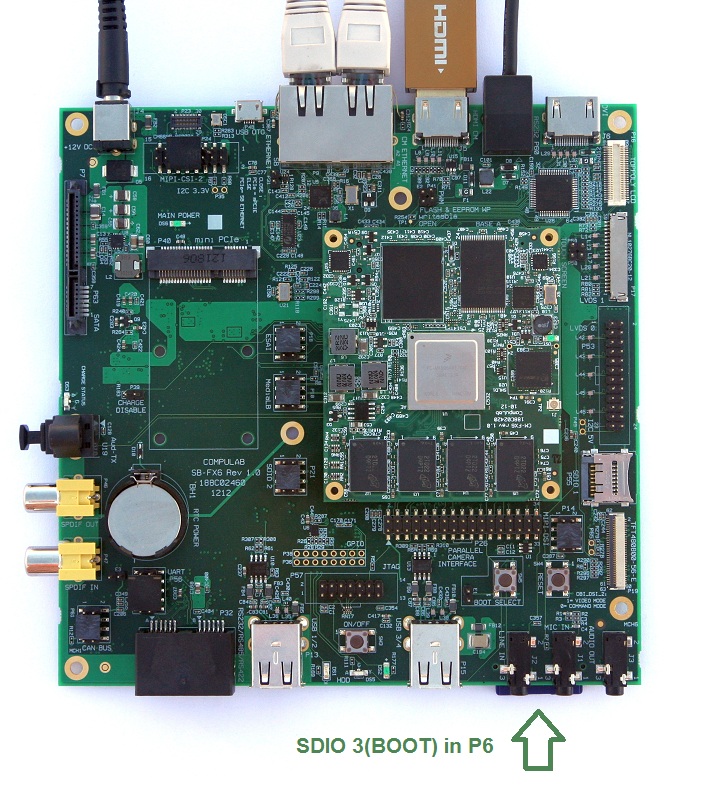
CM-FX6 may use either SD card (P6) or SATA SSD as root file system.
Installation onto SD card
Preconditions
- Properly connected CM-FX6 evaluation kit with valid U-Boot.
- SD-Card with minimal capacity of 2GB, which will serve as boot medium and root file system.
- PC workstation for creating bootable SD-Card.
Prepare bootable SD-Card
- Download prebuilt Android image.
- Unzip the file in order to get dd image.
- Flash the bootable image to the SD-Card following the directions.
- On Linux, the instructions below may be used instead:
# dd if=cmfx6-android.img of=/dev/sdc bs=4M
Boot
- Insert bootable SD-Card into SD-Card slot (P6).
- Power on.
- Within 3 seconds the device should start booting into Android.
- Within 60 seconds the HDMI display should start showing signs of life.
Installation onto SSD
Preconditions
- Properly connected CM-FX6 evaluation kit with valid U-Boot.
- SD-Card with minimal capacity of 2GB, which will serve as installer file system.
- PC workstation for creating bootable SD-Card.
Prepare installer SD card
- Download prebuilt installer image.
- Uncompress the file in order to get dd image.
- Flash the bootable image to the SD-Card following the directions.
- On Linux, the instructions below may be used instead:
# dd if=cm-fx6_android-ssd-installer.img of=/dev/sdc bs=4M
Launch installer
- Insert the bootable SD card into the CM-FX6 SD socket (P6) and turn the device on.
- CM-FX6 will automatically boot into the installer LXDE desktop.
- Double click on the CM-FX6 Image Installer icon to begin installation and follow the installation wizard directions.
Boot
- After the installation is complete, shut down CM-FX6 and remove the installation SD card.
- Restart CM-FX6.
| If the installation SD card is not removed, CM-FX6 will boot into the installer once again. |
- Within 3 seconds the device should start booting into Android.
- Within 60 seconds the HDMI display should start showing signs of life.
Advanced installation options
As CM-FX6 is developer-oriented device, the installation process and installer script itself can be customized, in order to fit customer's specific requirements.
The following section provides an insight into interactive installation process and installer implementation.
Installation wizard GUI
In the process of installation, the user is presented with a few dialogue windows.
In the top part of each window a brief description is provided.
The main stations in the installation process are:
- Target device selection - currently, only SATA SSD may be presented.
- Default partition size overriding - resizing the Android file system partitions, keep in mind:
- userdata - is where user applications are installed, and where user content (such as downloaded files, recorded video or audio, etc.) is stored
- resizing additional partitions can hardly be benefited
- Default video mode setting - select LCD, HDMI or DVI video output and its resolution. It is possible to override this setting later, following the display configuration directions.
Installer script structure
Below provided particular details about installer script structure:
- The installer is located within installer file system, under
/var/opt/utilite-installer/Android/cm-fx6-<release ID>
- The interactive installer consists of 2 phases:
- fs-inflate-gui: interactive GUI, that overrides default values in a configuration file
- fs-inflate: non-interactive installer script, that follows the configuration file, partitions the destination medium, formats it and copies the OS files
- For additional details on the Android installation process on CM-FX6, it is recommended to refer either to the installer script source code, or to the Building from source code page.