IOT-LINK: Getting Started
Contents
Quick Setup
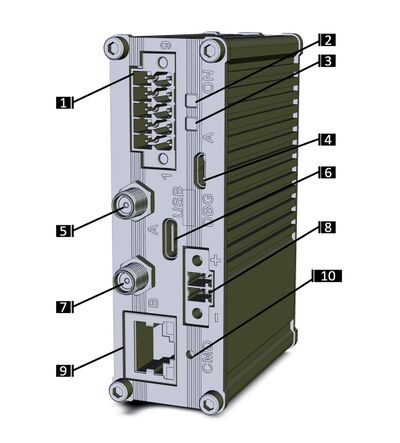
- Connect a USB cable between the host PC and IOT-LINK micro-USB console DBG connector (4). Verify that the serial port is visible on the host PC.
- On your host PC, start a terminal emulation program (such as Tera Term or PuTTy) with the following serial port settings:
Baud Rate Data Bits Stop Bits Parity Flow Control 115200 8 1 none none
- Use the Compulab IOTL-ACC-PSUTB2 PSU, insert the power supply plug into the IOT-LINK DC input terminal block (8).
- NOTE: In case another 12V-24V DC power source is being used: connect PSU wires to IOT-LINK DC input terminal block (8).
- Plug the power supply unit into an AC outlet. IOT-LINK will turn on and boot into Linux. Status Indicator (2) should blink blue.
- To log in into Debian Linux, use "compulab" as the username. There is no password. The device will ask to set the password for the "compulab" superuser on first login session.
IOT-LINK Overview
Front panel layout
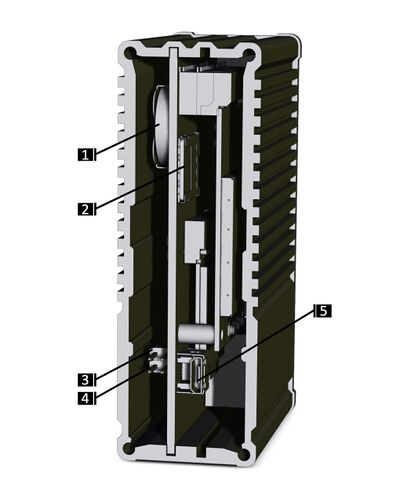
Back panel layout
| Figure | Callout | Function |
| 1 | RTC battery holder | |
| 2 | SIM card socket | |
| 3,4 | RS485 / CAN bus termination jumpers | |
| 5 | SDP programming port, micro-USB type | |
| NOTE: remove the back panel cover to access the connectors specified above | ||
Additional Resources

