Revision as of 09:51, 22 February 2010
Preparation steps

|
Windows CE may be installed on CM-X300 using either a USB flash drive or a network connection. USB flash drive installation is the preferred method
|
- Obtain a PC workstation with a serial communication port.
- For networked installation, install a TFTP server on the host PC. For Windows machines we recommend using TFTPD32.
- Download the Windows CE Demo package for CM-X300 from CompuLab website. Unzip the package to a directory on the host PC.
- All image files mentioned below can be found in the ImageFiles folder.
- Copy the contents of folder corresponding to the CM-X300 hardware configuration to a USB flash drive or to the folder exported by the TFTP server.
- CPU stepping is identified according to the CM-X300 part number:
- - C624 corresponds to PXA300
- - C624M corresponds to PXA310
Image installation

|
Do not reset or power off the CM-X300 during the installation process! Doing so may result in a disabled module!
|
- Connect the host PC to the CM-X300 via the serial cable supplied with the evaluation kit.
- Start a terminal emulation software on the host PC. Refer to Setting up a console for settings.
- Turn on the CM-X300 system. The U-Boot (initial boot-loader) will start with a command prompt.
|
|
If the boot settings of the CM-X300 are different from default, press and hold ^C while turning on the CM-X300 in order to get command prompt.
|
Installation with a USB flash drive
- Ensure that the files wince_updater.nb0, update.img, nk.bin, eboot.nb0 and, optionally, script.xml are present in the root directory of the USB flash drive.
- Connect the USB flash drive to USB2 (host/slave) port of the CM-X300 platform.
- Use the following U-Boot command to boot the Windows CE installer:
> run ce_setup
Installation with TFTP
- Connect CM-X300 Ethernet port to the local Ethernet network
- Ensure that the files wince_updater.nb0, update.img, nk.bin, eboot.nb0 and, optionally, script.xml are accessible by the TFTP server.
- - TFTPD32 users: copy the files mentioned above to a folder and point the TFTP server to that folder.
- Use U-Boot dhcp command to obtain an IP address or manually set the ipaddr environment variable:
> setenv ipaddr <CM-X300 ip address>
- Set the serverip environment variable and save the new environment to NAND flash:
> setenv serverip <host ip address>
> saveenv
- Use the following U-Boot command to boot the Windows CE installer:
> tftp 80400000 update.img && autoscr 80400000
Burning the image to NAND
- CM-X300 Updater application will be started automatically after Windows CE installer boot is complete. The following screen will be displayed:
- -
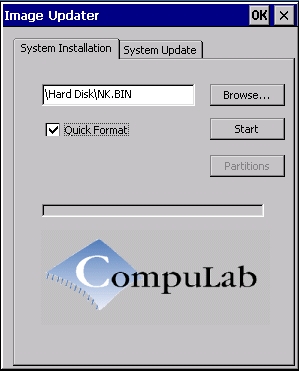
- The CM-X300 Updater will point to the \Hard Disk\NK.bin file, located on a USB flash disk.
- Uncheck the Quick Format check box to request a full low-level format of the CM-X300 NAND Flash.
- - A full low level format of the NAND Flash takes several minutes
- Press the Start button
- The update process takes several minutes.
- After the update is completed, the CM-X300 Updater will display the following notification.
- -
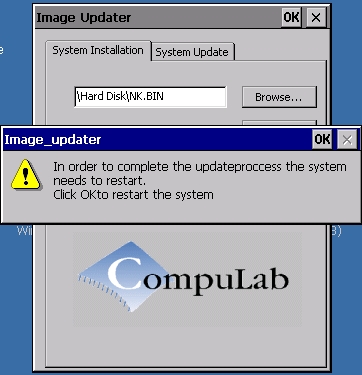
- Press OK.
Post Installation
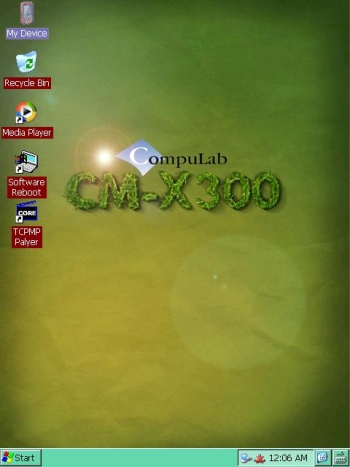
- Windows CE boots automatically when the CM-X300 is power cycled or reset.
- The following screen appears when the CM-X300 is up and running:
- -
See also


