Difference between revisions of "CM-T3530: WinCE: Getting Started"
(→Creating a bootable SD card) |
(→Creating a bootable SD card) |
||
| Line 4: | Line 4: | ||
== Creating a bootable SD card == | == Creating a bootable SD card == | ||
| + | {{Note | The TI SDCard boot utility does not work well on computers running Windows 7, use Windows XP (WinXP mode in Windows 7 works fine too.)}} | ||
* Download the latest [http://compulab.co.il/t3530/download/t3530-wince6-img.zip WinCE 6.0 runtime image for CM-T3530] and unzip the file. | * Download the latest [http://compulab.co.il/t3530/download/t3530-wince6-img.zip WinCE 6.0 runtime image for CM-T3530] and unzip the file. | ||
* Use the TI_SDCard_boot_utility to create a disk with partition table geometry compatible with the OMAP3 boot ROM. | * Use the TI_SDCard_boot_utility to create a disk with partition table geometry compatible with the OMAP3 boot ROM. | ||
Latest revision as of 12:17, 3 April 2011
Contents
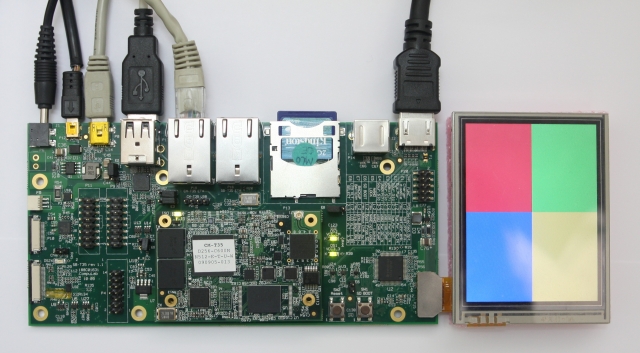
Connecting the module
The following picture shows the recommended evaluation kit setup
- -

Creating a bootable SD card
| The TI SDCard boot utility does not work well on computers running Windows 7, use Windows XP (WinXP mode in Windows 7 works fine too.) |
- Download the latest WinCE 6.0 runtime image for CM-T3530 and unzip the file.
- Use the TI_SDCard_boot_utility to create a disk with partition table geometry compatible with the OMAP3 boot ROM.
- Follow the steps below:
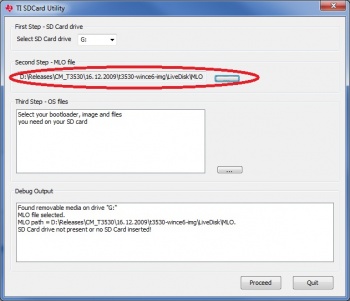
- Insert the SD card into an SD-Reader attached to the desktop computer (an SD-card is supplied with the CM-T3530 evaluation kit).
- Launch the TI_SDCard_boot utility (located in the Utils folder).
- Choose the drive letter of the SD reader.

- Select the MLO file from the LiveDisk folder.
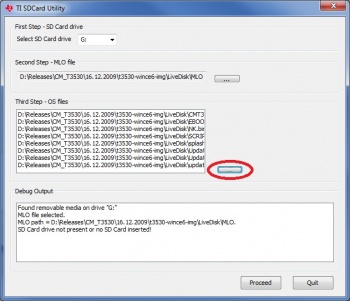
- Select the rest of the files in the LiveDisk folder.
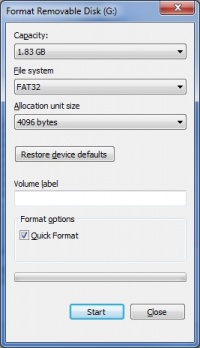
- Select the FAT 32 filesystem and 4096 bytes allocation unit size in the Format Removable Disk pop-up and start the SD card format process.
- After the formatting is complete, the utility automatically starts to copy the files to the SD card.
- Wait for the "Copying files done" message to appear in the debug output box.
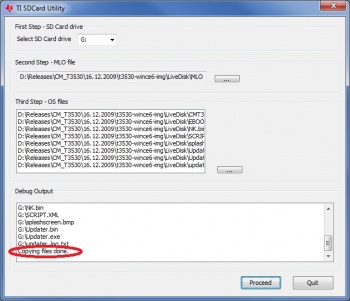
- Your SD card is now ready to boot the CM-T3530.


Installing the demo runtime image
- Insert the bootable SD card into the SD socket (connector P13 on SB-T35).
- Configure the CM-T3530 for SD-Boot mode. There are two ways to do it:
- Preferred way: Hold the “SD BOOT” button while booting the device. You should hold the button until the synthetic splash-screen (4 colored squares) appears.
- Installing jumper E6.
- Power on the device. The synthetic splash-screen (4 colored squares) will appear on LCD display within a few seconds.
- An Updater image (dedicated WinCE image) is loaded from the SD-Card. Updater image boot time is approximately 50 seconds.
- The Updater utility will start automatically. The utility will install the runtime image onto the CM-T3530 NAND flash.

- The following message box informs you that the process is complete.

- Make sure jumper E6 is removed. Otherwise, the installation process will be repeated next time you boot the device.
- Use the reset button to reboot the device.
- CompuLab WinCE demo image will be loaded from the NAND flash.
| Please refer to CM-T3530 Updater Guide for the technical installation process details |